സ്ത്രീകള്‍ എങ്ങിനെ വസ്ത്രം ധരിക്കണം എന്ന് പുരുഷന്‍ നിഷ്ക്കര്‍ഷിക്കുന്നത് ശരിയോ? അല്ലെങ്കില്‍ തിരിച്ചും?

Showing posts with label Windows Tips. Show all posts

Sunday, November 16, 2014

Clear Temp Folder Automaticly On Windows Exit!


Temp folder is used for keeping temporary files used in various programs. It has merits and demerits, when the files in it increased, it will slow our computer. So we need to clear it regularly. As it is risky, I am here to describe you how to clear your Temp folder automaticly
  • Open Run and type gpedit.msc
  • Press OK
  • Expand the tree to the following path
Computer Configuration > Administrative Templates > Windows Components > Terminal Services > Temporary folders


  • In the Right Pane, open the setting named Do not delete temp folder upon exit
  • Under Setting tab, slect Disabled option

  • Press OK
  • You’re Done…!

Wednesday, August 06, 2014

What is the Difference Between Log Off, Restart, and Shut Down?


http://sapost.blogspot.in/
A concept users frequently have difficulty with is the difference between “logging off,” “restarting,” and “shutting down” a system. This article will clear that up.


Tech support staff will often instruct users to take a specific action, such as “log off your system” or “power down the system.” Confusion between these terms can cause problems and waste the time of the support staff and the end user, so these are good, simple terms to understand.

To shut down (or power down, or power off) a system means that, when the process of shutting down is complete, the machine is powered down, and it will not come back up again without a someone taking further action, e.g., powering it back on again. If you expect your system will be needed for maintenance or remote access by someone else, shutting it down effectively prevents this.
To restart (or reboot) a system means that the computer goes through a complete shutdown process, then starts back up again. This is frequently required after software installations or during troubleshooting.
To log off a system means that the user who is currently logged on has their session end, but leaves the computer running for someone else to use. This is faster than a full restart and, generally, a better choice during the course of the business day when a system is shared between multiple users.
To power on a system means that you simply press the power button and let the system come up to a login prompt.
If you enter your username and password, you have gone a step further and have logged on.
If support staff instructs you to take a specific action, it is in everyone’s best interest that you do exactly what was suggested, and not something else. For instance, if you are instructed to “power on” your system, just power it on, but do not enter your username and password. Similarly, if you are requested to log off, just log off, but do not shut it down.

Monday, February 17, 2014

What is Windows XP end of support?


Microsoft has provided support for Windows XP for the past 12 years. But now the time has come for us, along with our hardware and software partners, to invest our resources toward supporting more recent technologies so that we can continue to deliver great new experiences.  As a result, after April 8, 2014, technical assistance for Windows XP will no longer be available, including automatic updates that help protect your PC. Microsoft will also stop providing Microsoft Security Essentials for download on windows XP on this date. (If you already have Microsoft Security Essentials installed, you will continue to receive anti-malware signature updates for a limited time, but this does not mean that your PC will be secure because Microsoft will no longer be providing security updates to protect your PC.)


If you continue to use Windows XP after support ends, your computer will still work but it might become more vulnerable to security risks and viruses. Also, as more software and hardware manufacturers continue to optimize for more recent versions of Windows, you can expect to encounter greater numbers of apps and devices that do not work with Windows XP

Saturday, December 07, 2013

Happy Retirement XP


ഒരു യാത്രാമൊഴി.


winxppro-copyമൈക്രോസോഫ്റ്റ് വിന്‍ഡോസ് XP. ആ പേര് ഒരിക്കലെങ്കിലും കേള്‍ക്കാത്തവര്‍, ഒന്ന് ഉപയോഗിക്കാത്തവര്‍ ഇന്ന് കമ്പ്യൂട്ടര്‍ ഉപയോഗിക്കുന്നവരില്‍ ഉണ്ടാകും എന്ന് തോന്നുന്നില്ല. 

കദേശം വിന്‍ഡോസ്‌ XP വാള്‍പേപ്പര്‍ പോലെ തന്നെ. ഇന്നും വിന്‍ഡോസ്‌ XP തരുന്നത് ആ ഗൃഹാതുരത്വം ആണ് ഒരു പക്ഷെ ആ ലാളിത്യം കൊണ്ടാവാം.. ഇന്ന് പക്ഷെ അതില്‍ നിന്നും വിട്ടുമാറാന്‍ തോന്നുന്നതേയില്ല .
എന്തായാലും അതെല്ലാം ഓര്‍ക്കാന്‍ സമയം ഇല്ല . സുരക്ഷാ പ്രശ്നങ്ങള്‍ മുന്‍ നിര്‍ത്തിയാണ് ഇപ്പോള്‍ വിന്‍ഡോസ്‌ XP ക് ഉള്ള സപ്പോര്‍ട്ട് മൈക്രോസോഫ്ട്‌ പിന്‍വലിക്കുന്നത് . 2014 ഏപ്രില്‍ 8 നു നമ്മുടെ പ്രിയപ്പെട്ട XP വിട വാങ്ങുകയാണ്. അന്ന് മുതല്‍ മുതല്‍ വിന്‍ഡോസ്‌ XP ഉപയോഗിക്കണം എങ്കില്‍ ഒരു ഉപഭോക്താവിനു 16750 രൂപയോളം ചെലവ് വരും. എങ്കില്‍ വിന്‍ഡോസ്‌ ന്റെ ഏതെങ്കിലും പുതിയ ഒപെരടിംഗ് സിസ്റ്റത്തിലേക്ക് മാറുന്നതിനാനെങ്കില്‍ 5025 രൂപ മാത്രം ആണ് ചെലവ് വരുന്നത് . മാത്രമല്ല പിന്നെയും കുറച്ചു കുഴപ്പങ്ങള്‍ കൂടി ഉണ്ട്. ഇപ്പോള്‍ നമ്മള്‍ ഇന്‍റര്‍നെറ്റില്‍ ഉപയോഗിക്കുന്ന IPv6 വിന്‍ഡോസ്‌ XPയില്‍ സപ്പോര്‍ട്ട് ചെയ്യില്ല. എന്തായാലും പറഞ്ഞിട്ട് കാര്യം ഇല്ലല്ലോ.. എന്‍റെ അതിയായ ദു ഖം അറിയിക്കുന്നു..
വിന്‍ഡോസ്‌ XP റിട്ടയര്‍മെന്റ് പ്രഖ്യാപിച്ചുകൊണ്ട് മൈക്രോസോഫ്റ്റ് ഇറക്കിയ ബാനര്‍ കാണാന്‍ ഇവിടെ ക്ലിക്ക് ചെയ്യുക

SPEED UP YOUR MENUS

It is very best trick of windows XP. After applying this trick you will feel excellent fast speed of your menus. This tricks doesn’t effect on windows startup or browsing speed. It just effects on your menus e.g start programe menu, right click menu etc. To apply this trick simply follow these steps.
i.                    Go to start menu and click on run
ii.                  Type “Regedit” and click “oK”. You will find registry editor window.
iii.                Click on “HKEY CURRENT USER” then click on “CONTROL PENAL” and finally click on “DESKTOP”


iv.                You will see a list on right side and search for “Menushowdelay”
v.                  Double click or right click on “Menu Show Delay” to modify thevalue data.
vi.                Change the value data of value name to “0” and click ok.
vii.              It is done. Enjoy an excellent menu opening speed.

(Note. You can adjust value according to your requirements. Minimum value is “0” but normally you can use 50 to 150 )


Courtesy : http://bnjho.blogspot.in

Sunday, December 01, 2013

TRICKS TO BOOT COMPUTER MORE FASTER

Often people say that their computers take a lot of time to start. Many visitors asked me by email about this problems. There are many reasons of this problem. I am telling you a few tricks which will be helpful to solve this problem.
  1. 1 .Click start --- run -----enter.
  2. Type “msconfig” and press enter.
  3. In the resultant window go to the “Startup” tab.
  4. You will see a list of programs which also start when we start computer.
  5. All program boxes will be checked. So you uncheck all unnecessary or unwanted programs except antivirus.  
  6. Click on apply and restart your computer. You will feel that your computer is faster than before.
2nd Trick to boot computer faster
      
    1.  Right click on “My computer” and select “Manage”
    2.  click on “Device Manager”. You will see a list of hardware.
    3.  If you are not using USB/COM ports, then disable them.
     4.  Restart your Computer. It will give you more better performance in booting.

Friday, October 18, 2013

Microsoft releases Windows 8.1, a year in making


This image provided by Microsoft shows updated Windows 8.1. Microsoft released its long-awaited Windows 8.1 upgrade as a free download on Thursday.

Microsoft released its long-awaited Windows 8.1 upgrade as a free download on Thursday. It addresses some of the gripes people have had with Windows 8, the dramatically different operating system that attempts to bridge the divide between tablets and PCs.

Windows 8.1 still features the dual worlds that Windows 8 created when it came out last October. On one hand, it features a touch-enabled tile interface resembling what’s found in tablet computers. On the other, there’s the old desktop mode where the keyboard and mouse still reign. The update adds some new finger- and gesture-friendly shortcuts for touch-based apps, while restoring some respect for the desktop mode that a billion PC users have become accustomed to.
The release comes as sales of traditional desktop and laptop computers continue to decline because consumers are spending money instead on the latest smart phones and tablets. It also comes at a time of transition for Microsoft as the Redmond, Washington, company focuses on devices and services, not just software. Earlier this month, Microsoft struck a deal to acquire Nokia’s phone business and patent rights for more than $7 billion. Microsoft is also searching for a new CEO to replace Steven A. Ballmer, who announced last month that he plans to retire within the next year.
The Window 8.1 update is free for current owners of Windows 8. Downloads started at 7 a.m. (1100 GMT) Thursday in New York, which corresponded to the start of Friday in New Zealand. Simply go to the Windows Store app to find it. It may take a few hours for updates to reach everyone. Computers with Windows 8.1 already installed will go on sale Friday local time. That’s also when people will be able to buy stand-alone copies of Windows 8.1.
The changes range from the cosmetic to improved functionality
RESTORING RESPECT FOR THE DESKTOP
START ME UP The Start button is back in desktop mode, although not the way it was before Windows 8 came along. In Windows 7 and before, a click on Start would have brought up programs and important folders in a list. Now, one tap on Start flips you back to the new tile interface, where you can click or tap tiles to open programs. A long press brings up crucial settings such as the Control Panel.
BOOT TO DESKTOP You can now start up the machine in desktop mode, bypassing the tiles for a short time. That removes some of the headache for companies that want to use Windows 8 but don’t want to buy a touch-screen monitor for every employee.
TOUCH AND GESTURE UPDATES
ONSCREEN KEYBOARD SWIPES The onscreen keyboard now includes the ability to type numbers or punctuation marks by swiping up or away from certain keys on the standard “QWERTY” layout, eliminating the need to toggle between numeric and alphabetic layouts. You can also select from suggested words mid-stream using side swipes and taps on the virtual spacebar.
GESTURE-ENABLED APPS You can now wave in the air in front of the front-facing camera to get a response. For example, in the new app Bing Food & Drink, a right-to-left wave in “Hands Free Mode” flips through pages of a recipe.
QUICKER TILE ORGANIZING You can tap and hold Windows tiles with your finger to move them. Another couple taps will allow you to resize them in one of four sizes. In the previous version, you had to go back to the mouse or touchpad and right-click on tiles to do this, and you were limited to two sizes.
EASIER APPS ACCESS Finding all your apps takes just a swipe up on your start screen, as long as you don’t do it from beyond the bottom edge. Before, you had to swipe up from the bottom edge, then tap on the All Apps button.
SMALL CONVENIENCES
AUTOMATIC UPDATES Apps update in the background, replacing the constant reminders to go to the Windows Store to update the apps yourself.
SMALLER TABLETS Windows 8.1 now has a home screen that looks good in portrait mode on screens measuring 7 inches to 8 inches diagonally.
LOCK SCREEN ACCESS You can now answer Skype calls or take photos from the lock screen without having to log in. Just swipe down. You can also set other apps like Twitter to send notifications when the screen is locked.
FUNCTIONAL CHANGES
BETTER MULTITASKING In Windows 8.1, you can run up to four apps at once side by side, double the previous amount, though you need a large, high-resolution monitor to do so (On their own, Microsoft’s Surface tablets are not big enough for more than two). You can resize panes using a slider that moves side to side, instead of being limited to one larger window and one slender one. This is still not as capable as Windows 7 or in desktop mode, where you can open dozens of items in windows that can be resized horizontally, vertically and diagonally. And many app makers have yet to adapt, meaning some apps still appear as a thin sliver, even if you want them to take up half the screen.
GLOBAL SEARCH Typing while on the tile-based start screen will pull up multiple search results if applicable from your computer, the Web and the Windows app store. If you’re searching for a musician, you’ll see a list of popular songs you can play using Xbox Music, and if it’s someone famous (like President Barack Obama) you’ll see biographical details, videos and other information. Before, you had to choose where to search- in apps, settings, computer files or on the Internet.
EMAIL UPDATE The standard-issue Mail app now has a “power pane” on left—hand side with folders for updates from social networks like Facebook, messages from favorite contacts and newsletters. Some of these features work only with Microsoft accounts such as Hotmail and Outlook.com, though. A new “sweep” command deletes multiple messages with a couple taps.
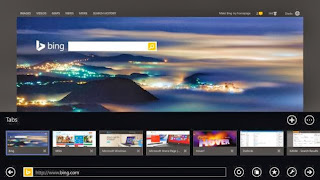
BETTER BROWSING No longer are you limited to 10 open tabs in the tile version of Internet Explorer. Before, Web pages automatically closed without prompts when you try to open more. You can open as many as you want now. Better yet, you can have two different websites displayed side by side, the way you’ve long been able to before Windows 8 came along.
FUN STUFF
XBOX MUSIC REFRESH The music streaming app now optimizes playback over discovery with a layout that has more lists and smaller photos. It also adds the ability to create playlists from any website with a couple taps. When on a website featuring artists, swipe in from the right edge and tap the Share button followed by the Music button. It will create a song playlist based on those artists, which you can then stream for free.
PICTURE EDITING A picture editor with pre-set effects comes with the update, allowing for photo touchups, cropping, contrast changes and other features.
XBOX ONE INTEGRATION You can pick up where you left off if you start playing a video purchased on Xbox Video on a tablet and then watch the rest on Microsoft’s upcoming game console, Xbox One.

Tuesday, October 15, 2013

ഫോട്ടോകളും വീഡിയോകളും ഓണ്‍ലൈനില്‍ സൂക്ഷിക്കാം. ഇപ്പോള്‍ നേടൂ 20GB തികച്ചും സൌജന്യമായി

ഫോട്ടോകളും വീഡിയോകളും ഓണ്‍ലൈനില്‍ സൂക്ഷിക്കാം. കോപ്പി ഡോട്ട് കോം

  ഇപ്പോള്‍ നേടൂ 20GB തികച്ചും സൌജന്യമായി


1
കംപ്യൂട്ടറില്‍ നമ്മുടെ പ്രധാന ഫയലുകള്‍ സൂക്ഷിക്കാന്‍ നാം എക്സ്റ്റേണല്‍ ഹാര്‍ഡ്ഡിസ്കാണല്ലോ സാധാരണ ഉപയോഗിക്കുന്നത്. എന്നാല്‍ ഹാര്‍ഡ്ഡിസ്ക് ക്രാഷ് ആകുന്നത് എല്ലാവരും നേരിടുന്ന പ്രശ്നമാണ്. കൂടാതെ വൈറസ് മൂലമുള്ള കേടുപാടുകളും സംഭവിക്കാം. ഇത്തരം ഒരു വേവലാതിക്കും ഇടംനല്‍കാതെ ഇന്റര്‍നെറ്റില്‍ത്തന്നെ ഫയലുകള്‍ സൂക്ഷിക്കാനുള്ള സാങ്കേതിക വിദ്യയാണ് ക്ലൌഡ് സ്റ്റോറേജ്. ഇതില്‍ ഫയലുകള്‍ ആക്സസ് ചെയ്യാന്‍ ഇന്റര്‍നെറ്റ് മാത്രം മതി. ക്രാഷ് ആവുമെന്ന പേടിവേണ്ട, എടുക്കാന്‍മറക്കുന്ന അവസ്ഥ ഇല്ല.
ഫയലുകള്‍ ഡയറക്ടറികളായി തരംതിരിച്ചു സൂക്ഷിക്കാം. കൈയിലുള്ള എല്ലാ പ്രധാനപ്പെട്ട ഡോക്യുമെന്റ്സ്, ഫോട്ടോകള്‍ എന്നിങ്ങനെ ഏതു ഫോര്‍മാറ്റിലുള്ള ഫയലുകളും നമുക്ക് ഇത്തരം സൈറ്റുകളില്‍ സൂക്ഷിക്കാം. ചുരുക്കിപ്പറഞ്ഞാല്‍ ഇന്റര്‍നെറ്റിലുള്ള നമ്മുടെ എക്സ്റ്റേണല്‍ ഹാര്‍ഡ്ഡിസ്കാണ് ഈ വെബ്സൈറ്റുകള്‍. ഫോട്ടോ ഷെയര്‍ സൈറ്റുകളില്‍ അപ്ലോഡ് ചെയ്താല്‍ ഫോട്ടോകളുടെ ക്വാളിറ്റി കുറയുമെന്ന പരിമിതി മറികടക്കാനും ഇത്തരം വെബ്സൈറ്റുകള്‍ സഹായിക്കും. ഇത്തരം ഒരു വെബ്സൈറ്റ് ആണ് കോപ്പി ഡോട്ട് കോം
.
20 ജിബിമുതല്‍ മുകളിലേക്ക് സ്ഥലം ഈ പോസ്റ്റിലുള്ള ലിങ്ക് വഴി സൗജന്യമായി കോപ്പിഡോട്ട് കോമില്‍ ലഭ്യമാണ്. ഇതിനു മൂന്ന് സ്റ്റെപ്പു കള്‍ ഉണ്ട്.
 1, അക്കൗണ്ട്‌ തുടങ്ങുക.
 2, കോപ്പി ഡോട്ട് കോം അപ്ലിക്കേഷന്‍ കംപ്യൂട്ടറില്‍ ആല്ലെങ്കില്‍ മൊബൈല്‍ ഫോണില്‍ ഇന്‍സ്റ്റോള്‍ ചെയ്യുക.
 3, അക്കൗണ്ട്‌ തുടങ്ങാനായി നല്കിയ ഇമെയില്‍ വെരിഫൈ ചെയ്യുക . ഇതിനായി ഇമെയില്‍ അക്കൗണ്ട്‌ ചെക്കുചെയ്താല്‍ കോപ്പി ഡോട്ട് കോമിന്‍റെ ഇമെയില്‍ കാണാം അതിലുള്ള ലിങ്കില്‍ ക്ലിക്ക് ചെയ്യുക. ചേരുമ്പോള്‍ 20 ജിബിയും മറ്റുള്ളവരെ റഫറല്‍വഴി ചേര്‍ത്താല്‍ ഓരോ യുസര്‍ക്കും 5 ജിബി വീതവും നിങ്ങള്‍ക്ക് കൂടുതല്‍ സ്റ്റോറേജ് ഇടം ലഭിക്കും. കോപ്പിഡോട്ട് കോമിന്റെ ഒരു സവിശേഷതസിങ്ക് ചെയ്യാനുള്ള സൗകര്യമാണ്. കംപ്യൂട്ടറിലും, ആന്‍ഡ്രോയ്ഡ, ആപ്പിള്‍, ബ്ലാക്ക്ബെറി ഫോണ്‍/ടാബ്ലറ്റുകളിലും ഡൗണ്‍ലോഡ് ചെയ്ത് ഇന്‍സ്റ്റാള്‍ചെയ്യാവുന്ന കോപ്പിഡോട്ട് കോമ് സോഫ്റ്റ്വെയര്‍, ഫയലുകളുടെ (ഫോള്‍ഡറുകളുടെയും) അപ്ലോഡിങ്/ഡൗണ്‍ലോഡിങ് വളരെ എളുപ്പമാക്കുന്നു. ഈ സോഫ്റ്റ്വെയര്‍ ഇന്‍സ്റ്റാള്‍ചെയ്തശേഷം അപ്ലോഡ് ചെയ്യേണ്ട ഫയലുകള്‍ ഏതു ഫോള്‍ഡറിലാണ് എന്ന് മാപ്പ്ചെയ്തു കൊടുക്കുകയേ വേണ്ടൂ. ബാക്കി കാര്യം കോപ്പി ഡോട്ട് കോം ഏറ്റെടുത്തോളും.
പുതിയ ഫയലുകള്‍ അപ്ലോഡ്ചെയ്യാന്‍ അത് വലിച്ച് ഈ ഫോള്‍ഡറില്‍ ഇടുകയെ വേണ്ടു. സിങ്കിങ് താനെ പിന്നാമ്പുറത്ത് നടന്നുകൊള്ളും. നമ്മള്‍ ശ്രദ്ധിക്കുകയേ വേണ്ട. ഇനി ഈ ഫയലുകളോ ഫോള്‍ഡറുകളോ മറ്റുള്ളവരോട് പങ്കിടണമെന്നിരിക്കട്ടെ. കോപ്പിഡോട്ട് കോമില്‍ അതിനുള്ള സൗകര്യവുമുണ്ട്. മറ്റുള്ളവരോട് നിങ്ങളുടെ ഫയലുകള്‍ ഷെയര്‍ചെയ്യാന്‍ മാത്രമല്ല, സ്വന്തം ഉപയോഗത്തിനും ഫയലുകള്‍ ബാക്ക്അപ്പ് ചെയ്യാനും കോപ്പിഡോട്ട് കോമ് ഉപയോഗിക്കാം. കോപ്പിഡോട്ട് കോമില്‍ 20GB FREE അക്കൗണ്ട്‌ തുടങ്ങുവാനുള്ള ലിങ്ക് ചുവടെ കൊടുത്തിരിക്കുന്നു.
കോപ്പി.കോം രജിസ്ട്രെഷന്‍ ലിങ്ക്

Source: http://boolokam.com/

Sunday, October 13, 2013

TUTORIAL FOR TAKING SCREEN SHOT IN WINDOWS


Press the "Print Screen" button on your keyboard. This will capture an image of your entire screen and copy it to the clipboard. The dimensions of the image will be the same as your desktop resolution.


Paste the screenshot. Once you’ve made the screenshot, you will need to paste it to a program in order to see it. The most common way to paste it is into a Paint file. This will allow you to save it as an image file that can be transferred to others.

Open Paint from the Accessories section in your Start menu. With a new blank canvas open, press Ctrl + V to paste the image onto the canvas. You can also open the Edit menu and select Paste, or right-click on the canvas and select Paste.

Click File, then Save to set the name and file type of the image. The most common file types are JPG and PNG. The recommended format for screenshots is PNG, due to the high quality and small file size.


Note: Hold down the "Alt" key and press "Print Screen" to take single active window Screenshot.


Courtesy : http://potools.blogspot.in

Sunday, August 18, 2013

Configuring Password Policy Settings in an Active Directory


Implementing Password Policy Settings Step-by-Step
  • Credentials: You must be logged on as a member of the Domain Admins group.
  • Tools: Active Directory Users and Computers.
  • To implement password policy on computer systems that belong to an Active Directory domain
    1. Click Start, click Control Panel, double-click Administrative Tools, and then double-click Active Directory Users and Computers.
    2. Right-click the root container for the domain:
      Active Directory Users and Computers

      Note: Screen shots in this document reflect a test environment and the information might differ from the information displayed on your screen.
    3. Select Properties from the menu that appears:
      Active Directory Users and Computers
    4. In the properties dialog box for your domain, click the Group Policy tab, and then click New to create a new Group Policy object in the root container. Type "Domain Policy" for the name of the new policy and then click Close.
      Note: Microsoft recommends that you create a new Group Policy object rather than editing the built-in one called Default Domain Policy because doing so makes it much easier to recover from serious problems with security settings. If the new security settings create problems, you can temporarily disable the new Group Policy object until you isolate the settings that caused the problems.
    5. Right-click the root container for the domain, and then click Properties.
    6. In the properties dialog box, click the Group Policy tab, and then select Domain Policy.
    7. Click Up to move the new GPO to the top of the list, and then click Edit to open the Group Policy Object Editor for the GPO you just created.
    8. Under Computer Configuration, navigate to the Windows Settings\Security Settings\Account Policies\Password Policy folder.
      Group Policy Object Editor
    9. In the details pane, double-click Enforce password history, select the Define this policy setting check box, set the value of Keep password history to 24, and then click OK.
      Enforce password history Prperties
    10. In the details pane, double-click Maximum password age, select the Define this policy setting check box, set the value of Password will expire in to 42, clickOK, and then click OK to close the Suggested Value Changes window that appears.
      Maximum password age Prperties
    11. In the details pane, double-click Minimum Password Age, select the Define this policy setting check box, set the value of Password can be changed after to 2, and then click OK.
      Minimum password age Prperties
    12. In the details pane, double-click Minimum Password Length, select the Define this policy setting check box, set the value of Password must be at least to 8, and then click OK.
      Minimum Password Length Prperties
    13. In the details pane, double-click Password must meet complexity requirements, select the Define this policy setting in the template check box, selectEnabled, and then click OK.
      Password must meet complexity requirements Prperties
    14. Close the Group Policy Object Editor, click OK to close your domain's properties dialog box, and then exit Active Directory Users and Computers.

Verifying New Settings

Use the following procedure to verify that the appropriate password policy settings are applied and effective in the Domain Policy GPO. Verifying the settings and their operation ensures that the correct password policies will be applied to all users in the domain.
Requirements
  • Credentials: You must be logged on as a member of the Domain Admins group.
  • Tools: Active Directory Users and Computers.
  • To verify password policy settings for an Active Directory domain
    1. Open Active Directory Users and Computers, right-click your domain, and then click Properties.
    2. In your properties dialog box for your domain, click the Group Policy tab, select the Domain Policy GPO, and then click Edit to open the Group Policy Object Editor.
    3. Under Computer Configuration, go to the Windows Settings\Security Settings\Account Policies\Password Policy folder, and verify that your settings match the settings shown here:
      Group Policy Object Editor
    4. Close the Group Policy Object Editor, click OK to close the properties dialog box for your domain, and then exit Active Directory Users and Computers.
    5. Verify that users cannot specify passwords that are shorter than 8 characters, that they cannot create non-complex passwords, and that they cannot immediately change their new passwords.
Courtesy :  http://potools.blogspot.in/

Wednesday, July 31, 2013

Start Menu for Windows 8 : Free Software


Start Menu 8 is specially designed for Windows 8. It offers a perfect solution for users who work with Windows Start Menu all the time and are not accustomed to the new Metro start screen in Windows 8. This smart tool brings back both the start button and Windows Start Menu, and offers the option to skip Metro start page, allowing users who only work on desktop to boot to Windows 8 desktop directly. It's the best start menu replacement for Windows 8.

Courtesy : http://foreignpostmumbai.blogspot.in

Wednesday, May 29, 2013

Shortcuts to master for Windows 7


Want to be more productive while using Windows 7? While some of these might be old hat as they worked with past Windows operating systems, you might discover a new one or two among the 45 shortcuts listed here. Plus, it’s always a good idea to have a quick refresher, no?
Save time and frustration while on your personal computer with these handy Windows 7 shortcuts, provided by Microsoft.
Mastering these simple keyboard strokes can really speed up your computing tasks, whether you rely on your PC for work or play (or likely, a bit of both).
What are your favourites? Have any of your own to share in the Comments section? Do tell!
Press this key  To do this


F1  Display Help


Ctrl+C (or Ctrl+Insert)  Copy the selected item


Ctrl+X Cut the selected item


Ctrl+V (or Shift+Insert) Paste the selected item


Ctrl+Z Undo an action


Ctrl+Y Redo an action


Delete (or Ctrl+D) Delete the selected item and move it to the Recycle Bin


Shift+Delete Delete the selected item without moving it to the Recycle Bin first


F2  Rename the selected item


Ctrl+Right ArrowMove the cursor to the beginning of the next word


Ctrl+Left Arrow Move the cursor to the beginning of the previous word


Ctrl+Down Arrow Move the cursor to the beginning of the next paragraph


Ctrl+Up ArrowMove the cursor to the beginning of the previous paragraph


Ctrl+Shift with an arrow keySelect a block of text


Shift with any arrow key Select more than one item in a window or on the desktop, or select text within a document


Ctrl with any arrow key+Spacebar  Select multiple individual items in a window or on the desktop


Ctrl+A Select all items in a document or window


F3  Search for a file or folder


Alt+Enter Display properties for the selected item


Alt+F4 Close the active item, or exit the active program


Alt+Spacebar Open the shortcut menu for the active window


Ctrl+F4Close the active document (in programs that allow you to have multiple documents open simultaneously)


Alt+TabSwitch between open items


Ctrl+Alt+Tab Use the arrow keys to switch between open items


Ctrl+Mouse scroll wheel  Change the size of icons on the desktop


Windows logo key  +TabCycle through programs on the taskbar by using Aero Flip 3-D


Ctrl+Windows logo key  +Tab Use the arrow keys to cycle through programs on the taskbar by using Aero Flip 3-D


Alt+EscCycle through items in the order in which they were opened


F6  Cycle through screen elements in a window or on the desktop


F4  Display the address bar list in Windows Explorer


Shift+F10 Display the shortcut menu for the selected item


Ctrl+Esc  Open the Start menu


Alt+underlined letter Display the corresponding menu


Alt+underlined letter Perform the menu command (or other underlined command)


F10 Activate the menu bar in the active program


Right Arrow  Open the next menu to the right, or open a submenu


Left ArrowOpen the next menu to the left, or close a submenu


F5 (or Ctrl+R)  Refresh the active window


Alt+Up Arrow View the folder one level up in Windows Explorer


Esc Cancel the current task


Ctrl+Shift+Esc  Open Task Manager


Shift when you insert a CD  Prevent the CD from automatically playing


Left Alt+Shift  Switch the input language when multiple input languages are enabled


Ctrl+ShiftSwitch the keyboard layout when multiple keyboard layouts are enabled


Right or Left Ctrl+Shift Change the reading direction of text in right-to-left reading languages

Courtesy : http://bnjho.blogspot.in