സ്ത്രീകള്‍ എങ്ങിനെ വസ്ത്രം ധരിക്കണം എന്ന് പുരുഷന്‍ നിഷ്ക്കര്‍ഷിക്കുന്നത് ശരിയോ? അല്ലെങ്കില്‍ തിരിച്ചും?

Monday, August 18, 2014

Confederation declares Nationwide Agitational Programme – Demands including DA Merger and Interim Relief


Confederation declares Nationwide Agitational Programme – Demands including DA Merger and Interim Relief
Confederation publishes  an organized series of agitational programme on its portal toady including the burning issues DA Merger and Interim Relief.
CONFEDERATION OF CENTRAL GOVT. EMPLOYEES & WORKERS
1st Floor, North Avenue PO Building, New Delhi – 110001
Website: WWW. Confederationhq.blogspot.com
Email: Confederationhq@yahoo.co.in
Ref: CIRCULAR No.18
Dated - 17.08.2014
To
All CHQ Officers Bearers
All Affiliated Organizations
All State C-O-Cs
CONFEDERATION DECLARES NATIONWIDE AGITATIONAL PROGRAMMES

Dear Comrades,
The National Sectt. of the Confederaton met at New Delhi on 11.08.2014 to consider the follow up action required in the matter of some of the pressing issues on which Confederation had organized series of agitational programmes prior to the commencement of the Election process of the 16th Lok Sabha. The CHQ has received reports from various affiliaties to the effect that they have all endorsed the common memorandum, the Confederation had submitted to the 7th CPC. Most of the affiliates have emailed copies of the respective memorandum to the CHQ. Those who have not sent copies are requested to do so without further loss of time. This will enable the Confederation to write to the 7th CPC to provide an opportunity to these organisations to tender oral evidence to explain and elucidate their submissions in the memorandum.
The meeting noted that there has been only negative response from the Government on the issues of Interim Relief and merger of DA.
We have already sent to you a copy of our letter addressed to the Seretary, Staff Side, JCM National Council, (Com. Shivgopal Mishra) which is yet to be responded. The meeting considered the following issues as important, the pursuance of which must not brook any delay, especially in the background that the 7th CPC has formally written to the Government asking it to indicate the course of action required to be taken on the memorandum of the staff side on Interim Relief and marger of DA.
CHARTER OF DEMANDS
1. Merger of DA with pay for all employees with effect from 01.01.2014 including Gramin Dak sewaks and pensioners.2. Grant of Interim Relief to all employees including Gramin Dak Sewaks and Pensioners.3. Inclusion of Gramind Dak sevaks under the purview of 7th Central pay Commission.4. Scrap PFRDA Act and grant of statutory pension to all.5. Date of effect of 7th CPC recommendations should be 01.01.2014.6. Regularisation and revision of wages of casual laboures and contract workers.7. Removal of 5% condition for compassionate appointments.8. Fill up al vacant posts and creation of new posts wherever justified.9. Stop downsizing, outsourcing, contractorisation and privatisation of Government functions.10. Grant Productivity linked Bonus to all without ceiling; compute Bonus as weighted average of PLB for those not covered by PLB agreement.11. Revise OTA and NDA and implement arbitration awards.
The meeting also considered the policy perception of the new Government in the light of the administrative price hike in petroleum products, the proposals in the Railway and General Budget, the steep hike in the freight and passenger fares of Railways, the decision to hike FDI in Defence Production, Railway Infrastructure and Insurance sectors, disinvestment of public sector including nationalized banks and have come to the inescapable conclusion that under Narendra Modi dispensation, the neo-liberal policies, as expected, will only be intensified and the promised “Achche Din” is for the Corporate giants of the country. The last session of the Parliament witnessed the determination of the NDA Government in changing the labour laws on the lines of the enactment made by Rajasthan Government of Vasundhara Raje Scindhia by virtue of which in almost 90% of the manufacturing units in India, the employers are permitted to indulge in hire and fire policy, for the existing regulations will be dispensed with.
The meeting came to the decision that the confederation must organise serious and prolonged campaign, preferably in unison with the Railway and Defence Federations. We will pursue our consultation with those Federations to reach a common approach in the matter. Since it might take some more time, the meeting decided to pursue the demands through a demonstrative programme.
11th September 2014 – Submission of the Charter of Demands along with a brief Note to all heads of offices by arranging demonstration in front of all offices; the branch level/district/divisional/state level leaders will explain the demands especially the memorandums on interim relief, DA merger and GDS issues.
19th September 2014 – Dharna between 10 AM to 3 PM at all important state/districts/divisional centres.
25th September 2014 – Dharna between 10 AM to 3 PM at New Delhi with participation of the leaders of all affiliates and the members working in the city of Delhi (at a central place-to be decided by the Confederation Delhi State committee).
Confederation office Bearers will meet again at Delhi on 26.09.2014, 5 PM to decide further course of action. Confederation will bring out pamphlets and bulletins to explain various issues like minimum wage, DA, Bonus, GDS problems etc. shortly as part of an education campaign. The detailed campaign programe to be undertaken after Diwali festival will be intimated later.
Comradely yours,
(M. Krishnan)
Secretary General
Source: http://confederationhq.blogspot.in/

Only 3 free withdrawals from other ATMs, 5 from own


If you are in a metro and planning to withdraw cash from other banks' automated teller machines (ATMs), be careful. Savings bank account holders will, henceforth, enjoy only three free transactions at other ATMs, instead of five per month.

The country's banking regulator, the Reserve Bank of India has just issued a note to this effect. This will apply for transactions done at ATMs located in six metro centres — Mumbai, Delhi, Chennai, Kolkata, Bangalore and Hyderabad, which are well-served in terms of payment infrastructure.

RBI said banks are free to offer free transactions above this mandated limit but not many banks are likely to offer freebies as cost of maintaining small accounts has risen over the years.

The new diktat will not apply to customers having no-frills or basic savings bank ( BSBDA) type of accounts as well as for those situated outside these six metro centres.

The objective of this direction, RBI said, is to "move away from micro management of business decision of banks while protecting the interests of the weaker sections of the society".

RBI said it has taken into account the associated costs of infrastructure to banks and the economy more generally before coming up with the new direction.

The central bank has also advised banks to provide their own savings bank account holders with at least five free transactions per month at their own ATMs. Beyond this, banks may decide to levy transaction charges but that should not exceedRs 20 plus taxes per transaction.

The number of ATMs has increased to over 1.6 lakh across the country at the end-March 2014 from a little over 27,000 seven years back.

The point-of-sale (POS) infrastructure has increased from 3.2 lakh to 10.65 lakh terminals during the same period. The development of other payment mechanisms and related infrastructure is more visible in metropolitan areas.

Reserve Bank of India told banks to keep customers aware of the changes in the rules to improve customer satisfaction quotient.
Source : The Economic Tumes

Sunday, August 17, 2014

Connect to another computer using Remote Desktop Connection


With Remote Desktop Connection, you can connect to a computer running Windows from another computer running Windows that's connected to the same network or to the Internet. For example, you can use all of your work computer's programs, files, and network resources from your home computer, and it's just like you're sitting in front of your computer at work.

To connect to a remote computer, that computer must be turned on, it must have a network connection, Remote Desktop must be enabled, you must have network access to the remote computer (this could be through the Internet), and you must have permission to connect. For permission to connect, you must be on the list of users. Before you start a connection, it's a good idea to look up the name of the computer you're connecting to and to make sure Remote Desktop connections are allowed through its firewall.
If you're user account doesn't require a password to sign in, you'll need to add a password before you're allowed to start a connection with a remote computer.
Watch this video to learn how to connect to another computer using Remote Desktop Connection (1:13)

To allow remote connections on the computer you want to connect to

1.       Open System by clicking the Start button  , right-clicking Computer, and then clicking Properties.
2.       Click Remote settings.   If you're prompted for an administrator password or confirmation, type the password or provide confirmation.

The Remote tab in the System Properties dialog box
3.       Under Remote Desktop, select one of the three options.
4.       Click Select Users.
If you're an administrator on the computer, your current user account will automatically be added to the list of remote users and you can skip the next two steps.
5.       In the Remote Desktop Users dialog box, click Add.
6.       In the Select Users or Groups dialog box, do the following:
·         To specify the search location, click Locations, and then select the location you want to search.
·         In Enter the object names to select, type the name of the user that you want to add, and then click OK.
The name will be displayed in the list of users in the Remote Desktop Users dialog box. Click OK, and then click OK again.

Note

·         You can’t connect to a computer that's asleep or hibernating, so make sure the settings for sleep and hibernation on the remote computer are set to Never. (Hibernation is not available on all computers.) For information about making those changes, see Change, create, or delete a power plan (scheme).   
      To look up the computer name of the remote computer

1.       On the remote computer, open System by clicking the Start button  , right-clicking Computer, and then clickingProperties.
2.       Under Computer name, domain, and workgroup settings, you can find your computer name, and its full computer name if your computer is on a domain.
Your network administrator might also be able to give you the name of the computer.
To allow Remote Desktop connections through a Windows Firewall

If you're having trouble connecting, Remote Desktop connections might be getting blocked by the firewall. Here's how to change that setting on a Windows PC. If you're using another firewall, make sure the port for Remote Desktop (usually 3389) is open.
1.       On the remote computer, click Start and select Control Panel.
2.       Click System and Security.
3.       Click Allow a program through Windows Firewall under Windows Firewall.
4.       Click Change settings and then check the box next to Remote Desktop.
5.       Click OK to save the changes.

To set a password for your user account

Your user account must have a password before you can use Remote Desktop to connect to another computer.
1.       Click Start and select Control Panel.
2.       Double-click User Accounts.
3.       Select Change your Windows Password under User Accounts.
4.       Click Create a password for your account and follow the instructions on the screen.

To start Remote Desktop on the computer you want to work from

1.       Open Remote Desktop Connection by clicking the Start button  . In the search box, type Remote Desktop Connection, and then, in the list of results, click Remote Desktop Connection.
2.       In the Computer box, type the name of the computer that you want to connect to, and then click Connect. (You can also type the IP address instead of the computer name.)

Notes

·         To find the Remote Desktop Connection shortcut, click the Start button  , click All Programs, and then click Accessories. To quickly open Remote Desktop Connection, click the Start button  , type mstsc in the search box, and then press Enter.
·         Redirecting a device on your computer makes it available for use in a Remote Desktop session. If a Remote Desktop Connection dialog box appears after you click Connect and enter your credentials, you can redirect local devices and resources, such as your local drives or Clipboard. Click Details, and then select the check box for each item you want to redirect.
For more information about Remote Desktop, see Remote Desktop Connection: frequently asked questions.
Source : microsoft.com/

GATE 2015: Things one should know before applying


The application process for GATE 2015 shall commence on September 1, 2014. Interested candidates will have to apply online through the zonal GATE websites of IISc or any of the seven IITs.

The GATE 2015 score will be valid for a period of three years from the date of announcement of results. All the papers in GATE 2015 will be held in online mode only and some examinations will be conducted in multiple sessions.

According to GATE 2015 website, the GATE examination will be held on January 31, February 01, 07, 08, 14, 2015. There are some important facts aboutt GATE 2015 that candidates should know before applying and preparing for the examination.

The Online Computer Based Test (CBT) will be held for all the 22 papers. The online examination paper will contain some questions for which numerical answers must be keyed in by the candidate using the virtual keypad. Rest of the questions shall be Multiple Choice Questions (MCQ).

Candidates will have to go through biometric information (photograph and fingerprints) verification before the start of the examination.

GATE 2015 examinations will be held in two sessions - forenoon and afternoon sessions on alternate weekends (Saturday and Sunday) between January 31, 2015 and February 14, 2015. Examination for some of the papers in GATE 2015 will be held in multiple sessions.

Subjectwise examination schedule will be notified later. For GATE 2015, the entire process of filling up of application form, uploading of certificates/documents etc. will be online and the candidates should not send any hard copy of their application form/documents, etc. to any of the IIT/IISc zonal GATE office.

Payments of application fees will be accepted only online through different modes like net banking, debit/credit card, e-challan, etc. The admit cards for GATE 2015 would be available through the online process only. Candidates can download their admit card from GATE 2015 website. No hard copy of admit cards will be posted to the candidates.

Source : http://indiatoday.intoday.in/

How to Add Borders to Word 2010 Tables


microsoft-word-logo

Once you have created a table in your document, you may want to spiff it up a bit by changing the borders.
Luckily, it is not all that difficult to do in Word and there are several methods you can choose from to accomplish this, which are listed below:
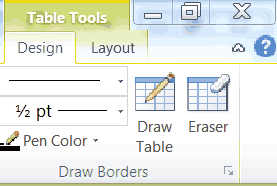
  • When you select your table or place your cursor in your table, you will notice that the Conditional Table Tools menu becomes available, where you will see both the Design and Layout tabs. In the Design tab, look in the Table Styles group where you will find the Borders tool.
table tools
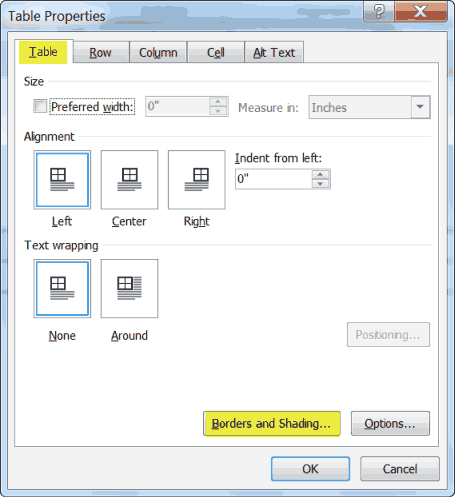
  • Under the Layout tab, in the Table group, click on the Properties command and Word will display the Table Properties dialog box, where you will find a Borders and Shading button.
table properties dialog
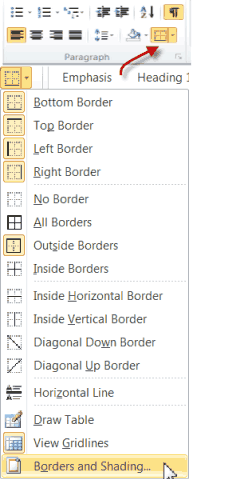
  • The Borders control on the Home tab of your ribbon, in the Paragraph group also works on tables.
home tab borders
  • There is a Borders and Shading option on the context menu when you right-click in your table.
  • The Draw table and Eraser controls found in the Tool’s Design tab, in the Draw Borders group will allow you to add and remove table lines one cell at a time.
If you click on the arrow of any of the various Borders tools, a drop-down list of ways to apply border lines to your whole table and individual cells will appear.
If borders have been applied to to the table cell where your cursor is, as in gridlines, the Borders control will be highlighted.
Interestingly enough, if your current cell does not have a border applied, but there are borders applied to any cell in your table then, at least one of the lines in the table in the borders control icon in your ribbon will be solid. It does not really stand out, so you will have to look closely to see it.
At the very bottom of the Borders drop-down list there are options to display the Borders and Shading dialog box and to toggle View Gridlines.
The Draw Table and Eraser tools are great for adding and removing one or two lines at specific locations in your table. The Draw Borders group can be found on the Design tab and it is the last one. It contains controls to set line thickness, color and style.
Clicking the Draw Table tool will convert your cursor to a pencil. Thereafter, clicking on any line in your table makes the line the color, style and thickness selected in the tool.
Clicking and dragging between any two lines in your table cell will split the cells along those line.
Clicking on the Eraser tool changes your cursor into an eraser that will delete any cell lines that it touches. The Esc key will cancel the eraser mode.
Regardless of which method you select to create your borders, there are myriad ways in which you can accomplish this task. Try them all and then make your decision on what best suits your particular needs.
Courtesy : http://bnjho.blogspot.in/

NHM Writer For Type With Your Own Language


NHM Writer For Type With Your Own Language

Features:

  • Context sensitive key preview
  • Enables "Regional Language Support" without need of "Windows CD".
  • Extendable to more encodings & Keyboard layouts for any language.
  • "Windows Text Services" for smooth typing of Unicode in MS Office applications.
Select Your Local Language At The Time Of Installation

Languages Supported : Assamese, Bengali, Gujarathi, Hindi, Kannada, Malayalam, Marati, Punjabi, Tamil, Telugu


Download NHM Writer From Google Drive : Download


Source : http://software.nhm.in/

Friday, August 15, 2014

HAPPY INDEPENDENCE DAY ! 2014


WISH YOU ALL A HAPPY INDEPENDENCE DAY   2014  - from http://rmssa.blogspot.com/

To all my dearest, sweetest and most loving Views............
One Nation, One Vision, One Identity
“No Nation is Perfect, it needs to be made perfect.”
Meri Pehchaan Mera India
Happy Independence Day .
 
Yours
V P Sujeendra Babu Thalavady
RMS, Tiruvalla


ആശംസിക്കുന്നു !!!
സ്വാതന്ത്ര്യദിനാശംസകള്‍......
ഹ്യദയപൂര്‍വ്വം
സുജീന്ദ്രബാബു തലവടി

ഏവര്‍ക്കും സ്വാതന്ത്ര്യ ദിനാശംസകള്‍


രാജ്യം ഇന്ന് 68 ആം സ്വാതന്ത്ര്യ ദിനം ആഘോഷിക്കുന്നു. പ്രധാനമന്ത്രി ചെങ്കോട്ടയില്‍ ദേശീയ പതാക ഉയര്‍ത്തിയതോടെ ആഘോഷങ്ങള്‍ക്ക് ഔപചാരിക തുടക്കമായി.
ഭീകരാക്രമണ ഭീഷണിയെ തുടര്‍ന്ന് രാജ്യമെമ്പാടും കനത്ത സുരക്ഷാ സന്നാഹമാണ് ഒരുക്കിയിരിക്കുന്നത്. ഈ ആഹ്ലാദ വേളയില്‍ RMS SA ഏവര്‍ക്കും സ്വാതന്ത്ര്യ ദിനാശംസകള്‍ നേരുന്നു

How to Add Borders to Word 2010 Tables


microsoft-word-logo

Once you have created a table in your document, you may want to spiff it up a bit by changing the borders.
Luckily, it is not all that difficult to do in Word and there are several methods you can choose from to accomplish this, which are listed below:
  • When you select your table or place your cursor in your table, you will notice that the Conditional Table Tools menu becomes available, where you will see both the Design and Layout tabs. In the Design tab, look in the Table Styles group where you will find the Borders tool.
table tools
  • Under the Layout tab, in the Table group, click on the Properties command and Word will display the Table Properties dialog box, where you will find a Borders and Shading button.
table properties dialog
  • The Borders control on the Home tab of your ribbon, in the Paragraph group also works on tables.
home tab borders
  • There is a Borders and Shading option on the context menu when you right-click in your table.
  • The Draw table and Eraser controls found in the Tool’s Design tab, in the Draw Borders group will allow you to add and remove table lines one cell at a time.
If you click on the arrow of any of the various Borders tools, a drop-down list of ways to apply border lines to your whole table and individual cells will appear.
If borders have been applied to to the table cell where your cursor is, as in gridlines, the Borders control will be highlighted.
Interestingly enough, if your current cell does not have a border applied, but there are borders applied to any cell in your table then, at least one of the lines in the table in the borders control icon in your ribbon will be solid. It does not really stand out, so you will have to look closely to see it.
At the very bottom of the Borders drop-down list there are options to display the Borders and Shading dialog box and to toggle View Gridlines.
The Draw Table and Eraser tools are great for adding and removing one or two lines at specific locations in your table. The Draw Borders group can be found on the Design tab and it is the last one. It contains controls to set line thickness, color and style.
Clicking the Draw Table tool will convert your cursor to a pencil. Thereafter, clicking on any line in your table makes the line the color, style and thickness selected in the tool.
Clicking and dragging between any two lines in your table cell will split the cells along those line.
Clicking on the Eraser tool changes your cursor into an eraser that will delete any cell lines that it touches. The Esc key will cancel the eraser mode.
Regardless of which method you select to create your borders, there are myriad ways in which you can accomplish this task. Try them all and then make your decision on what best suits your particular needs.
Courtesy : http://bnjho.blogspot.in/

8 Surprising Facts about Google


Google has become an essential part of our lives.  We have often heard people saying let’s “Google it.” Users can search for the information they desire by entering keywords and using operators. In March 2007, Google was noted as the most visited website, having over 528 million visits for the month. Here is a list of 8 interesting facts about Google


#1. Fact 1:


When you sit down at your computer and perform a Google search, the machine checks  the google index to determine the most relevant search results to be delivered to you. Google's search engine is a powerful tool; it takes over 200 factors into account before delivering you the best results for your query. Google uses a special algorithm called the Googlebot to generate search results.


#2. Fact 2:


Google owns a cluster of domains such as, Gooogle.com, Gogle.com, and Googlr.com, which directs to Google.com. Interestingly, Google also owns 466453.com, which is strange. Take a look at your telephone keypad, and match up the numbers to the letters “4 GHI 6 MNO 6 MNO 4 GHI 5 JKL 3 DEF,” that is “466453= Google.” So if you type any of these knowingly or unknowingly, it doesn’t take you to some strange page, you will still land up on Google.com.


#3. Fact 3:


When Google was founded in September 1998, it served ten thousand search queries per day. Currently, there are more than 2 million Google searches per second. The search engine finds a trillion unique URLs on the Web, crawls many billion sites a day, and processes numerous searches every month. Current Google search volume estimates are delivered through statistical analysis.


#4. Fact 4:


Google takes on the best projects that could change the world for millions of people. In 2012, Google introduced the Cherokee language in Gmail. While Google has continuously expanded its language support for Gmail and its other services, this was the first time that Google added a Native American tribal language to its list. As part of this effort, Google also added Cherokee to its recently launched virtual keyboards for Gmail. This has been helping the younger generation to communicate with the elders.


#5. Fact 5:


The concept of the Google Doodle was formed on August 30, 1998 when company co-founders Larry Page and Sergey Brin placed a simple stick-figure drawing behind the second "o" in the word “Google”. This first Google logo art was planned as a message to the website's users that the founders were "out of office" at the Burning Man festival in the Nevada desert.

#6. Fact 6:


Advertising is one of the biggest drivers of the search giant’s revenue gains. In 2013, about 91% of Google's $55.5 billion revenue was derived from its advertising programs. Google's AdWords allows advertisers to display their advertisements in the Google content network, through either a cost-per-click or cost-per-view scheme. The sister service, Google AdSense, allows website owners to display advertisements on their website and earn money every time the ads are clicked.


#7. Fact 7:


Google's search index is more than 100 million gigabytes in size. It would take 100,000 one-terabyte personal drive to contain the same amount of data.


#8. Fact 8:


Google might be the only company with a clear goal to reduce the amount of time people spend on its site. The company uses a policy often called Innovation Time Off, where Google engineers are encouraged to spend 20 percent of their work time on projects that interest them.