സ്ത്രീകള്‍ എങ്ങിനെ വസ്ത്രം ധരിക്കണം എന്ന് പുരുഷന്‍ നിഷ്ക്കര്‍ഷിക്കുന്നത് ശരിയോ? അല്ലെങ്കില്‍ തിരിച്ചും?

Sunday, August 17, 2014

Connect to another computer using Remote Desktop Connection


With Remote Desktop Connection, you can connect to a computer running Windows from another computer running Windows that's connected to the same network or to the Internet. For example, you can use all of your work computer's programs, files, and network resources from your home computer, and it's just like you're sitting in front of your computer at work.

To connect to a remote computer, that computer must be turned on, it must have a network connection, Remote Desktop must be enabled, you must have network access to the remote computer (this could be through the Internet), and you must have permission to connect. For permission to connect, you must be on the list of users. Before you start a connection, it's a good idea to look up the name of the computer you're connecting to and to make sure Remote Desktop connections are allowed through its firewall.
If you're user account doesn't require a password to sign in, you'll need to add a password before you're allowed to start a connection with a remote computer.
Watch this video to learn how to connect to another computer using Remote Desktop Connection (1:13)

To allow remote connections on the computer you want to connect to

1.       Open System by clicking the Start button  , right-clicking Computer, and then clicking Properties.
2.       Click Remote settings.   If you're prompted for an administrator password or confirmation, type the password or provide confirmation.

The Remote tab in the System Properties dialog box
3.       Under Remote Desktop, select one of the three options.
4.       Click Select Users.
If you're an administrator on the computer, your current user account will automatically be added to the list of remote users and you can skip the next two steps.
5.       In the Remote Desktop Users dialog box, click Add.
6.       In the Select Users or Groups dialog box, do the following:
·         To specify the search location, click Locations, and then select the location you want to search.
·         In Enter the object names to select, type the name of the user that you want to add, and then click OK.
The name will be displayed in the list of users in the Remote Desktop Users dialog box. Click OK, and then click OK again.

Note

·         You can’t connect to a computer that's asleep or hibernating, so make sure the settings for sleep and hibernation on the remote computer are set to Never. (Hibernation is not available on all computers.) For information about making those changes, see Change, create, or delete a power plan (scheme).   
      To look up the computer name of the remote computer

1.       On the remote computer, open System by clicking the Start button  , right-clicking Computer, and then clickingProperties.
2.       Under Computer name, domain, and workgroup settings, you can find your computer name, and its full computer name if your computer is on a domain.
Your network administrator might also be able to give you the name of the computer.
To allow Remote Desktop connections through a Windows Firewall

If you're having trouble connecting, Remote Desktop connections might be getting blocked by the firewall. Here's how to change that setting on a Windows PC. If you're using another firewall, make sure the port for Remote Desktop (usually 3389) is open.
1.       On the remote computer, click Start and select Control Panel.
2.       Click System and Security.
3.       Click Allow a program through Windows Firewall under Windows Firewall.
4.       Click Change settings and then check the box next to Remote Desktop.
5.       Click OK to save the changes.

To set a password for your user account

Your user account must have a password before you can use Remote Desktop to connect to another computer.
1.       Click Start and select Control Panel.
2.       Double-click User Accounts.
3.       Select Change your Windows Password under User Accounts.
4.       Click Create a password for your account and follow the instructions on the screen.

To start Remote Desktop on the computer you want to work from

1.       Open Remote Desktop Connection by clicking the Start button  . In the search box, type Remote Desktop Connection, and then, in the list of results, click Remote Desktop Connection.
2.       In the Computer box, type the name of the computer that you want to connect to, and then click Connect. (You can also type the IP address instead of the computer name.)

Notes

·         To find the Remote Desktop Connection shortcut, click the Start button  , click All Programs, and then click Accessories. To quickly open Remote Desktop Connection, click the Start button  , type mstsc in the search box, and then press Enter.
·         Redirecting a device on your computer makes it available for use in a Remote Desktop session. If a Remote Desktop Connection dialog box appears after you click Connect and enter your credentials, you can redirect local devices and resources, such as your local drives or Clipboard. Click Details, and then select the check box for each item you want to redirect.
For more information about Remote Desktop, see Remote Desktop Connection: frequently asked questions.
Source : microsoft.com/

GATE 2015: Things one should know before applying


The application process for GATE 2015 shall commence on September 1, 2014. Interested candidates will have to apply online through the zonal GATE websites of IISc or any of the seven IITs.

The GATE 2015 score will be valid for a period of three years from the date of announcement of results. All the papers in GATE 2015 will be held in online mode only and some examinations will be conducted in multiple sessions.

According to GATE 2015 website, the GATE examination will be held on January 31, February 01, 07, 08, 14, 2015. There are some important facts aboutt GATE 2015 that candidates should know before applying and preparing for the examination.

The Online Computer Based Test (CBT) will be held for all the 22 papers. The online examination paper will contain some questions for which numerical answers must be keyed in by the candidate using the virtual keypad. Rest of the questions shall be Multiple Choice Questions (MCQ).

Candidates will have to go through biometric information (photograph and fingerprints) verification before the start of the examination.

GATE 2015 examinations will be held in two sessions - forenoon and afternoon sessions on alternate weekends (Saturday and Sunday) between January 31, 2015 and February 14, 2015. Examination for some of the papers in GATE 2015 will be held in multiple sessions.

Subjectwise examination schedule will be notified later. For GATE 2015, the entire process of filling up of application form, uploading of certificates/documents etc. will be online and the candidates should not send any hard copy of their application form/documents, etc. to any of the IIT/IISc zonal GATE office.

Payments of application fees will be accepted only online through different modes like net banking, debit/credit card, e-challan, etc. The admit cards for GATE 2015 would be available through the online process only. Candidates can download their admit card from GATE 2015 website. No hard copy of admit cards will be posted to the candidates.

Source : http://indiatoday.intoday.in/

How to Add Borders to Word 2010 Tables


microsoft-word-logo

Once you have created a table in your document, you may want to spiff it up a bit by changing the borders.
Luckily, it is not all that difficult to do in Word and there are several methods you can choose from to accomplish this, which are listed below:
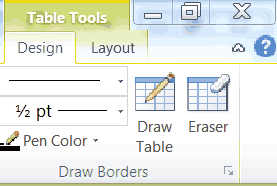
  • When you select your table or place your cursor in your table, you will notice that the Conditional Table Tools menu becomes available, where you will see both the Design and Layout tabs. In the Design tab, look in the Table Styles group where you will find the Borders tool.
table tools
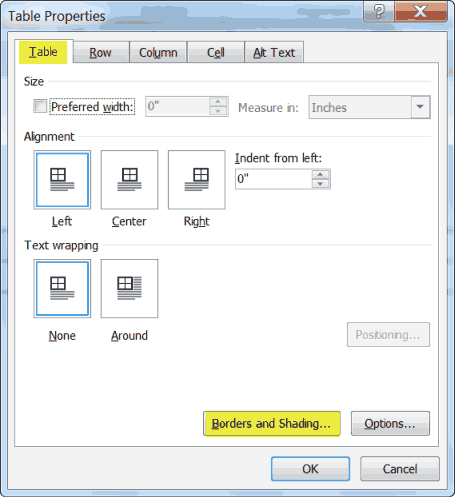
  • Under the Layout tab, in the Table group, click on the Properties command and Word will display the Table Properties dialog box, where you will find a Borders and Shading button.
table properties dialog
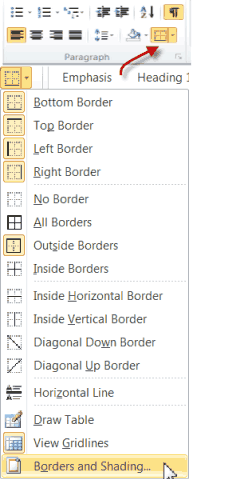
  • The Borders control on the Home tab of your ribbon, in the Paragraph group also works on tables.
home tab borders
  • There is a Borders and Shading option on the context menu when you right-click in your table.
  • The Draw table and Eraser controls found in the Tool’s Design tab, in the Draw Borders group will allow you to add and remove table lines one cell at a time.
If you click on the arrow of any of the various Borders tools, a drop-down list of ways to apply border lines to your whole table and individual cells will appear.
If borders have been applied to to the table cell where your cursor is, as in gridlines, the Borders control will be highlighted.
Interestingly enough, if your current cell does not have a border applied, but there are borders applied to any cell in your table then, at least one of the lines in the table in the borders control icon in your ribbon will be solid. It does not really stand out, so you will have to look closely to see it.
At the very bottom of the Borders drop-down list there are options to display the Borders and Shading dialog box and to toggle View Gridlines.
The Draw Table and Eraser tools are great for adding and removing one or two lines at specific locations in your table. The Draw Borders group can be found on the Design tab and it is the last one. It contains controls to set line thickness, color and style.
Clicking the Draw Table tool will convert your cursor to a pencil. Thereafter, clicking on any line in your table makes the line the color, style and thickness selected in the tool.
Clicking and dragging between any two lines in your table cell will split the cells along those line.
Clicking on the Eraser tool changes your cursor into an eraser that will delete any cell lines that it touches. The Esc key will cancel the eraser mode.
Regardless of which method you select to create your borders, there are myriad ways in which you can accomplish this task. Try them all and then make your decision on what best suits your particular needs.
Courtesy : http://bnjho.blogspot.in/

NHM Writer For Type With Your Own Language


NHM Writer For Type With Your Own Language

Features:

  • Context sensitive key preview
  • Enables "Regional Language Support" without need of "Windows CD".
  • Extendable to more encodings & Keyboard layouts for any language.
  • "Windows Text Services" for smooth typing of Unicode in MS Office applications.
Select Your Local Language At The Time Of Installation

Languages Supported : Assamese, Bengali, Gujarathi, Hindi, Kannada, Malayalam, Marati, Punjabi, Tamil, Telugu


Download NHM Writer From Google Drive : Download


Source : http://software.nhm.in/

Friday, August 15, 2014

HAPPY INDEPENDENCE DAY ! 2014


WISH YOU ALL A HAPPY INDEPENDENCE DAY   2014  - from http://rmssa.blogspot.com/

To all my dearest, sweetest and most loving Views............
One Nation, One Vision, One Identity
“No Nation is Perfect, it needs to be made perfect.”
Meri Pehchaan Mera India
Happy Independence Day .
 
Yours
V P Sujeendra Babu Thalavady
RMS, Tiruvalla


ആശംസിക്കുന്നു !!!
സ്വാതന്ത്ര്യദിനാശംസകള്‍......
ഹ്യദയപൂര്‍വ്വം
സുജീന്ദ്രബാബു തലവടി

ഏവര്‍ക്കും സ്വാതന്ത്ര്യ ദിനാശംസകള്‍


രാജ്യം ഇന്ന് 68 ആം സ്വാതന്ത്ര്യ ദിനം ആഘോഷിക്കുന്നു. പ്രധാനമന്ത്രി ചെങ്കോട്ടയില്‍ ദേശീയ പതാക ഉയര്‍ത്തിയതോടെ ആഘോഷങ്ങള്‍ക്ക് ഔപചാരിക തുടക്കമായി.
ഭീകരാക്രമണ ഭീഷണിയെ തുടര്‍ന്ന് രാജ്യമെമ്പാടും കനത്ത സുരക്ഷാ സന്നാഹമാണ് ഒരുക്കിയിരിക്കുന്നത്. ഈ ആഹ്ലാദ വേളയില്‍ RMS SA ഏവര്‍ക്കും സ്വാതന്ത്ര്യ ദിനാശംസകള്‍ നേരുന്നു

How to Add Borders to Word 2010 Tables


microsoft-word-logo

Once you have created a table in your document, you may want to spiff it up a bit by changing the borders.
Luckily, it is not all that difficult to do in Word and there are several methods you can choose from to accomplish this, which are listed below:
  • When you select your table or place your cursor in your table, you will notice that the Conditional Table Tools menu becomes available, where you will see both the Design and Layout tabs. In the Design tab, look in the Table Styles group where you will find the Borders tool.
table tools
  • Under the Layout tab, in the Table group, click on the Properties command and Word will display the Table Properties dialog box, where you will find a Borders and Shading button.
table properties dialog
  • The Borders control on the Home tab of your ribbon, in the Paragraph group also works on tables.
home tab borders
  • There is a Borders and Shading option on the context menu when you right-click in your table.
  • The Draw table and Eraser controls found in the Tool’s Design tab, in the Draw Borders group will allow you to add and remove table lines one cell at a time.
If you click on the arrow of any of the various Borders tools, a drop-down list of ways to apply border lines to your whole table and individual cells will appear.
If borders have been applied to to the table cell where your cursor is, as in gridlines, the Borders control will be highlighted.
Interestingly enough, if your current cell does not have a border applied, but there are borders applied to any cell in your table then, at least one of the lines in the table in the borders control icon in your ribbon will be solid. It does not really stand out, so you will have to look closely to see it.
At the very bottom of the Borders drop-down list there are options to display the Borders and Shading dialog box and to toggle View Gridlines.
The Draw Table and Eraser tools are great for adding and removing one or two lines at specific locations in your table. The Draw Borders group can be found on the Design tab and it is the last one. It contains controls to set line thickness, color and style.
Clicking the Draw Table tool will convert your cursor to a pencil. Thereafter, clicking on any line in your table makes the line the color, style and thickness selected in the tool.
Clicking and dragging between any two lines in your table cell will split the cells along those line.
Clicking on the Eraser tool changes your cursor into an eraser that will delete any cell lines that it touches. The Esc key will cancel the eraser mode.
Regardless of which method you select to create your borders, there are myriad ways in which you can accomplish this task. Try them all and then make your decision on what best suits your particular needs.
Courtesy : http://bnjho.blogspot.in/

8 Surprising Facts about Google


Google has become an essential part of our lives.  We have often heard people saying let’s “Google it.” Users can search for the information they desire by entering keywords and using operators. In March 2007, Google was noted as the most visited website, having over 528 million visits for the month. Here is a list of 8 interesting facts about Google


#1. Fact 1:


When you sit down at your computer and perform a Google search, the machine checks  the google index to determine the most relevant search results to be delivered to you. Google's search engine is a powerful tool; it takes over 200 factors into account before delivering you the best results for your query. Google uses a special algorithm called the Googlebot to generate search results.


#2. Fact 2:


Google owns a cluster of domains such as, Gooogle.com, Gogle.com, and Googlr.com, which directs to Google.com. Interestingly, Google also owns 466453.com, which is strange. Take a look at your telephone keypad, and match up the numbers to the letters “4 GHI 6 MNO 6 MNO 4 GHI 5 JKL 3 DEF,” that is “466453= Google.” So if you type any of these knowingly or unknowingly, it doesn’t take you to some strange page, you will still land up on Google.com.


#3. Fact 3:


When Google was founded in September 1998, it served ten thousand search queries per day. Currently, there are more than 2 million Google searches per second. The search engine finds a trillion unique URLs on the Web, crawls many billion sites a day, and processes numerous searches every month. Current Google search volume estimates are delivered through statistical analysis.


#4. Fact 4:


Google takes on the best projects that could change the world for millions of people. In 2012, Google introduced the Cherokee language in Gmail. While Google has continuously expanded its language support for Gmail and its other services, this was the first time that Google added a Native American tribal language to its list. As part of this effort, Google also added Cherokee to its recently launched virtual keyboards for Gmail. This has been helping the younger generation to communicate with the elders.


#5. Fact 5:


The concept of the Google Doodle was formed on August 30, 1998 when company co-founders Larry Page and Sergey Brin placed a simple stick-figure drawing behind the second "o" in the word “Google”. This first Google logo art was planned as a message to the website's users that the founders were "out of office" at the Burning Man festival in the Nevada desert.

#6. Fact 6:


Advertising is one of the biggest drivers of the search giant’s revenue gains. In 2013, about 91% of Google's $55.5 billion revenue was derived from its advertising programs. Google's AdWords allows advertisers to display their advertisements in the Google content network, through either a cost-per-click or cost-per-view scheme. The sister service, Google AdSense, allows website owners to display advertisements on their website and earn money every time the ads are clicked.


#7. Fact 7:


Google's search index is more than 100 million gigabytes in size. It would take 100,000 one-terabyte personal drive to contain the same amount of data.


#8. Fact 8:


Google might be the only company with a clear goal to reduce the amount of time people spend on its site. The company uses a policy often called Innovation Time Off, where Google engineers are encouraged to spend 20 percent of their work time on projects that interest them.

Important Cat Judgement regarding MACP


IMPORTANT CAT JUDGEMENT

DECLINING REGULAR PROMOTION BEFORE THE DATE OF IMPLEMENTATION OF ACP OR MACP SCHEME SHOULD NOT BE A BAR FOR GRANTING ACP/MACP
Refusal to accept promotion, earlier to 09.08.1999 when the ACP scheme was promulgated, does not make an employee ineligible for grant of first financial benefits under ACP scheme when the scheme came into force only on 09.08.1999

Facts: The Applicant (who was appointed on 08.03.1980), while working as Radio Mechanic in India Meteorological Department refused his promotion due to family circumstances, when his promotion order was issued on 30.07.1998.
The Assured career Progression Scheme came into force on 09.08.1999. The Applicant having completed 12 years of service and stagnating in the same post of Radio Mechanic was rejected for the financial benefit of ACP on the ground that he refused his promotion when offered on 30.07.1998 earlier to the introduction of ACP scheme on 09.08.1999.
Modified Assured Career Progression Scheme (MACP) was introduced for financial upgradation on 19.05.2009. As per this scheme, an employee will be entitled for three financial upgradation after completion of 10, 20 and 30 years of continuance of service. The Applicant became eligible for 1st ACP in 2000 and 2nd MACP in 2010. The grievance of the Applicant is that, he was denied 1st ACP and 2nd MACP. Hence he filed this OA challenging the Office Orders 10/11-12-2008 and 20-9-2010 whereby he was denied the financial upgradation.
The Respondents state that he refused promotion issued by Order dated 30.07.1998. In terms of DoP&T O. M. No. 35034/1/1997 Establishment (D) (Vol. IV), dated 18.07.2001, the Applicant cannot be said to stagnate in the same post. Hence the 1st ACP benefits was refused. The Applicant annexed the judgement of Bombay Bench of the Tribunal as appeared in Swamynews of July, 2008.
The Bombay Bench of the CAT held that “If an employee has refused the promotion before the enforcement of ACP Scheme, the facts would remain that he has actually not been given any financial upgradation which he could have been before regular promotion. He remains on the scale of pay still stagnated”. In view of this clarification, the clarification of Respondents cannot be accepted. Ernakulam Bench of CAT in OA No. 768 of 2005 considered condition No. 10 makes it amply clear that if an employee is accepting ACP benefit, he is deemed to have given unqualified acceptance for regular promotion on occurrence of vacancy subsequently”. That precludes factoring of past refusal while given ACP benefit.
In view of the above, refusals of promotion earlier to 9-8-1999, has no effect on the grant of financial benefit under ACP scheme. Hence, the clarification given no Doubt No. 38 by DoP&T cannot be accepted in this case as the Applicant herein refused promotion earlier to the coming of ACP Scheme. In that view, refusal of grant of 2nd financial upgradation under MACP scheme amount to punishing him for the second time. Hence, the eligibility of benefits under ACP scheme has to be recknoned on the actual date namely 9-8-1999. Hence declaining promotion earlier to 9-8-1999 is no reason to deny the first ACP introduced on 9-8-1999. Hence, a direction was given to Respondents to grant the Applicants benefits under the ACP scheme irrespective of the fact of their refusal of promotion earlier to 9-8-1999. Time given for implementation was 6 weeks.
In view of the above, same relief given by Bombay Bench is to be followed in this case also.
In the result, the impugned Order, dated 10/11-12-2008 and 20-9-2010 are set aside. The Respondents are directed to grant financial benefits under the ACP scheme to the Applicant in 12 weeks from the date of receipt of this order.
This the OA stands allowed.
(Shri. Ganesh Bhavrao Shrote v. Secretary, Ministry of Earth Sciences Mausam Bhavan, New Delhi, New Delhi, 8/2014, SwamynewS 98, (Bombay), date of judgement 5-8-2013)
NB: Reproduced from Swamy’s News August 2014-Tribunal Judgements
Source: http://confederationhq.blogspot.in/ [http://confederationhq.blogspot.in/2014/08/important-cat-judgement-declining.html]

2014 International letter-writing competition for young people


The 2014 UPU annual competition asked budding writers to explain how music can influence lives.

A poignant letter written by a violin proved music to the international jury’s ears, earning 13-year-old Nataša Milošević, from Bosnia and Herzegovina, the gold medal. 

It is the first time that Bosnia and Herzegovina wins the international competition since becoming a UPU member in 1993. The silver medal is awarded to 10-year-old Zou Canyan from Bai Shan (Ji Lin Province), People’s Republic of China, while 11-year-old Ashley Nicole Abalos, from Manila, Philippines, takes bronze.
The international jury was composed of Jesse Boere, a young singer-songwriter from the Netherlands and Chair of IMC Youth, the youth group of the International Music Council; Matt Clark, programme manager with Jeunesses Musicales International, the world’s largest youth music non-governmental organization; Emily Randall, outreach assistant at Playing for Change, a U.S.-based organization that creates and supports music schools around the world; Adrian Kreda, professor and dean of piano at the Conservatoire de Musique de Genève; and Damiano Giuranna, music and artistic director of the World Youth Orchestra, a UNICEF goodwill ambassador. 
Source : http://www.upu.int/en/the-upu/international-letter-writing-competition-for-young-people/2014-competition.html

Wednesday, August 06, 2014

What is the Difference Between Log Off, Restart, and Shut Down?


http://sapost.blogspot.in/
A concept users frequently have difficulty with is the difference between “logging off,” “restarting,” and “shutting down” a system. This article will clear that up.


Tech support staff will often instruct users to take a specific action, such as “log off your system” or “power down the system.” Confusion between these terms can cause problems and waste the time of the support staff and the end user, so these are good, simple terms to understand.

To shut down (or power down, or power off) a system means that, when the process of shutting down is complete, the machine is powered down, and it will not come back up again without a someone taking further action, e.g., powering it back on again. If you expect your system will be needed for maintenance or remote access by someone else, shutting it down effectively prevents this.
To restart (or reboot) a system means that the computer goes through a complete shutdown process, then starts back up again. This is frequently required after software installations or during troubleshooting.
To log off a system means that the user who is currently logged on has their session end, but leaves the computer running for someone else to use. This is faster than a full restart and, generally, a better choice during the course of the business day when a system is shared between multiple users.
To power on a system means that you simply press the power button and let the system come up to a login prompt.
If you enter your username and password, you have gone a step further and have logged on.
If support staff instructs you to take a specific action, it is in everyone’s best interest that you do exactly what was suggested, and not something else. For instance, if you are instructed to “power on” your system, just power it on, but do not enter your username and password. Similarly, if you are requested to log off, just log off, but do not shut it down.