സ്ത്രീകള്‍ എങ്ങിനെ വസ്ത്രം ധരിക്കണം എന്ന് പുരുഷന്‍ നിഷ്ക്കര്‍ഷിക്കുന്നത് ശരിയോ? അല്ലെങ്കില്‍ തിരിച്ചും?

Showing posts with label Printing Tips. Show all posts

Wednesday, December 28, 2011

Overview of Print to Post

Print to Post is an unique product of India Post that offers total solutions to the businesses covering printing services, mail room services, distribution services and bill collection services. In the past, businesses were going to printers for their print requirements, mailing agents for pre-mailing requirements and post office for mailing requirements. With Print to Post service, businesses can walk to the Post office for a one-stop-shop service that combines printing, inserting, sealing, franking, mailing , distribution and collection of the bills

Once printed, the bills and other communication will be sent by letter post or Speed Post, as per the requirements of the customer. The entire communication chain becomes easy and integrated, through Print to Post services. The facility provides state of the art high speed variable printing in multi-colour duplex printing systems.
Range of solutions offered under Print to Post The primary objective of Print to Post’ is to provide value addition to the businesses, by providing an integrated service covering the following areas.

  • Printing of bills, invoices, direct mailers, etc that involve variable printing process in a large scale.
  • Pre-mailing processes including inserting, sealing, franking etc using mechanized systems.
  • Distribution of the materials through Standard Post, Registered Post or Speed Post as per the requirement of the customers.
  • Collection of bills from the customers through Post office network.

Benefits to the customers: Printing, distribution and collection under one roof

With Print to Post, businesses can focus on their core business effectively and leave the non-core areas like printing, mailing, distribution and collection to India Post, which has the required expertise in distribution and collection across India. Under this service, printing, distribution and collection will be under one roof, thus providing enormous cost advantage to the businesses. The target sector of this brand new service is Government, Banking, Insurance, Utilities, Telecom and other organizations. Already India Post is handling the mails of banking and insurance sectors along with the mail of sectors like electricity, water supply and other public utilities. In the Print to Post, India Post will have the capacity to print these mailers efficiently, month after month, and deliver the printed mail to customers in time.


Courtesy : saparavur.blogspot.com

Monday, December 19, 2011

OLIVETTY PASSBOOK PRINTER CALIBRATION


Olivetti passbook printers are widely used printer in post offices. Sometimes we find problem with printer when it stops printing. In that case, calibrating the printer can solve your problem. Follow the steps to calibrate Olivetti PR2/PR2E passbook printer:
  • Switch off the printer.
  • Open the top cover of the printer and keep Head of printer at extreme left side.
  • Press all three buttons ("Station 1", "Local" and "Station 2") and then switch on the printer. Printer will give a beep sound.
  • Now close the top cover of the printer and press "Station 1" two times. The print Head will start moving and roller will start rolling.
  • Now press "Station 2" once and then add a paper to the printer and again press"Station 2".
  • Printer should take paper inside and all LEDs should blink within 5-10 seconds.
  • If not, then keep pressing "Station 2" until all LEDs glow.
  • Now switch off the printer and take test print. To take test print, press "Station 2"and power on the printer. If printer gives you the proper test page then congratulations, your printer has been troubleshooted.
  • Note: Calibrating a printer is not an easy task and you may do these steps three-four times to calibrate the printer properly
Sources:http//www.sapost.blogspot.com

Saturday, October 29, 2011

eMO Printing Solution for HP Laserjet 1160 Printer

In printing eMO through HP Laserjet 1160 Printer, sometimes we may face the need of pressing green switch for printing every eMO.

To solve this problem, delete existing HPLaserjet 1160 Printer and Install HPLaserjet1100(MS) driver using Add Printer Wizard.

Solution by:
Mr. Anil
B.R.Project SO. Shimoga Division
Thanks to him for this valuable information.


Courtesy : http://doputtur.blogspot.com/

Friday, October 21, 2011

HOW TO: Print to a USB Printer from DOS in Windows XP

In order to print from DOS in an offline environment like the stores, you will need to do a couple of things.

1) Install the Microsoft Loopback Adapter
a) In Control Panel, double click on Add Hardware.
b) Click Next
c) When the scan finishes, select "Yes, I have already connected the hardware"
d) Click Next
e) Scroll to the bottom of the list and select "Add a new hardware device"
Click Next
f) Select "Install the hardware that I manually select from a list (Advanced)"
g) Click Next
h) Select "Network Adapters"
i) Click Next
j) Select "Microsoft" under the Manufacturer list.
k) Select "Microsoft Loopback Adapter" in the Network Adapter list.
l) Click Next
m) Click Next
n) Click Finish

2) Configure the Adapter
a) The loopback adapter is a virtual network adapter and can be configured the same as a regular network card.
b) Set the adapter to have a static IP address such as 192.168.1.1/ 255.255.255.0

3) Share the printer.
a) I recommend you use a share name that you will remember. I used “Printer” in the new machines that are already deployed.

4) Capture the printer port.
a) NET USE LPT1: \\[Computer Name]\Printer /PERSISTENT:YES

Wednesday, October 19, 2011

HOW TO: Print to a USB Printer from DOS in Windows XP

In order to print from DOS in an offline environment like the stores, you will need to do a couple of things.
1) Install the Microsoft Loopback Adapter
a) In Control Panel, double click on Add Hardware.
b) Click Next
c) When the scan finishes, select "Yes, I have already connected the hardware"
d) Click Next
e) Scroll to the bottom of the list and select "Add a new hardware device"Click Next
f) Select "Install the hardware that I manually select from a list (Advanced)"
g) Click Next
h) Select "Network Adapters"
i) Click Next
j) Select "Microsoft" under the Manufacturer list.
k) Select "Microsoft Loopback Adapter" in the Network Adapter list.
l) Click Next
m) Click Next
n) Click Finish
2) Configure the Adapter
a) The loopback adapter is a virtual network adapter and can be configured the same as a regular network card.
b) Set the adapter to have a static IP address such as 192.168.1.1/ 255.255.255.0
3) Share the printer.
a) I recommend you use a share name that you will remember. I used “Printer” in the new machines that are already deployed.
4) Capture the printer port.
a) NET USE LPT1: \\[Computer Name]\Printer /PERSISTENT:YES

Monday, August 22, 2011

Printing problems and printing errors

Automatically diagnose and repair when you cannot print, or for problems installing a printer, connecting to a network printer and related errors. Find other automated solutions
Instruction to Run
  • Click the Run now button below
  • Then follow the onscreen prompts to launch

What it fixes...

  • You are unable to install a printer, connect to a printer, or print more than one job at a time
  • You receive an error indicating your Print Spooler service is experiencing problems
  • You receive an error indicating your is not the default printer
  • You receive an error indicating: cannot be contacted over the network
  • Identify if your printer is turned off
  • Identify if your printer toner is low or empty causing your print job to appear faint or it does not print at all
  • Identify if your printer paper is low or empty
  • Identify if the printer has a paper jam which is preventing it from operating normally
  • Identify if a print job that is in the print queue is preventing other print jobs from printing
  • Identify if you need to update your print driver
  • You receive an error stating that your Plug and Play printer %PRINTERNAME% has encountered a driver problem


How to Share and add Network Printer in Windows 7

Sharing printers and adding a network printer is very easy in Windows 7. If you have a printer attached to your computer, you can share it with anyone on the same network. You can control who will access the printer or who will not in the network.
But printers that are directly connected to a network rather than attached to a computer are available to anyone on the same network. These printers must have a network port or wireless connection that allows them to connect directly to the network.
You can share a printer by following these few steps. First of all, attach the printer, power it on and then continue with the following steps:
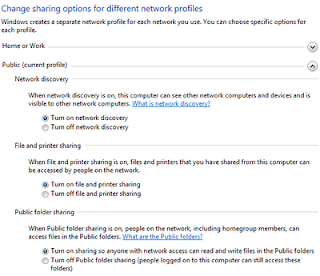
Turn the file and printer sharing ON

1. Go to Control Panel\Network and Sharing Center\Advanced sharing settings.

2. Click the chevron to expand the current network profile.
3. Under File and printer sharing, select Turn on file and printer sharing, and then click Save changes.


4. Now you need to share the printer.
To share your printer

1. Go to Start and open Devices and Printers.

3. Click the Sharing tab, and select the Share this printer check box.

Your printer is now available for other people on your network. All they need to do is add a network printer to their computers.
To add a network printer

1. Go to Start and open Devices and Printers.
2. Click Add a printer.

3. Click Add a network, wireless, or Bluetooth printer, click the shared printer, click Next, and follow the instructions on the screen.


4. Once the printer will be successfully installed, you can use it.


Courtesy : http://www.thewindowsclub.com/